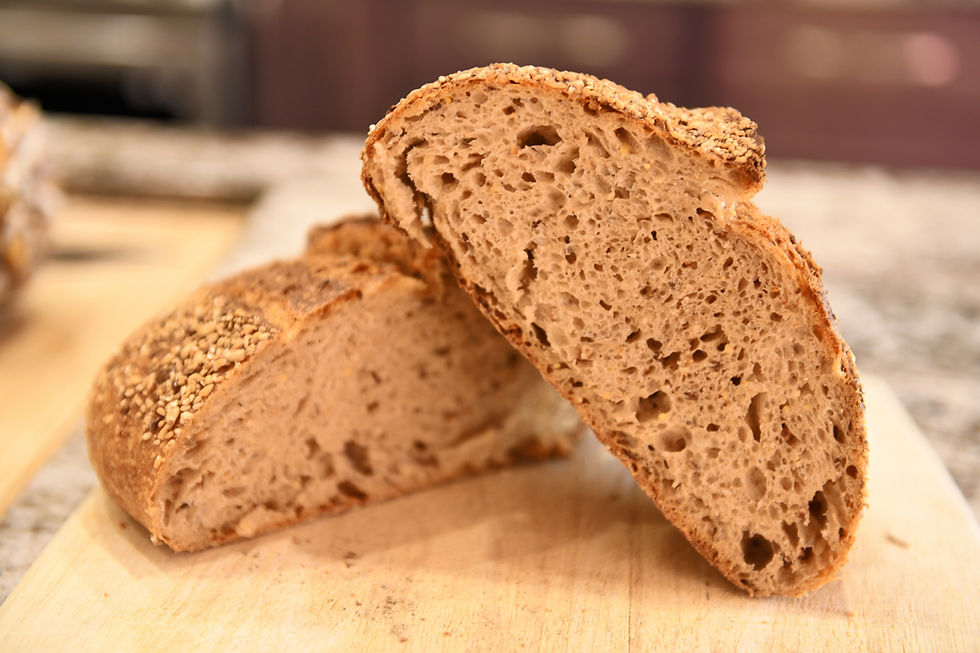
Grainy Goodness Sourdough Bread
- Mia At Green Corner

- Nov 29, 2024
- 5 min read
Updated: Aug 16, 2025

Making sourdough is all about getting those measurements just right, so grab your trusty food scale—it’s your new best friend! Before you dive in, set yourself up for success with a good old mise en place (that’s a fancy way of saying, "Get everything ready beforehand"). Now, here’s the fun part: different flours can be a little quirky, soaking up more or less water depending on their mood (or, you know, their type). I’ll be honest, I’m not a fancy artisan baker, so I’ll leave the pro tips to the masters. But what I’m sharing here is my way—the method I’ve honed through trial, error, and a whole lot of delicious practice with recipes and flours galore. Oh, and my secret weapon? My KitchenAid stand mixer. It’s the sourdough sidekick I didn’t know I needed until it saved my wrists and perfected my dough. Give it a whirl (literally), and happy baking!
Tip: Oodles of videos online to learn techniques for hand mixing, stretching and shaping loaves for sourdough which is treated differently than traditional bread.
INGREDIENTS
METHOD - Makes 2 loaves
Night before: Mix levian using 100 g sourdough starter, 200 g water and 200 g flour. Do not overmix. Cover and leave on counter until ready to mix in the morning (10 - 12 hours).
Next morning: Mise en Place - Mix Bread Dough with KitchenAid Stand Mixer. Place your stand mixer bowl on the scale, zero your kitchen scale. Place 1000 g flour into the bowl and 600 g of the warm water to total 1600 g. Autolyse (mix for 1 minute on speed 2 with dough hooks). Cover with a clean tea towel and let sit in the stand for 30 minutes.
Add 400 g levian to the flour/water mixture. Mix for 3 minutes on speed 2. Cover and sit for 30 minutes.
Add 22 g sea salt. Mix for 3 minutes on speed 2. Cover and sit for 30 minutes.
Stretch and fold using wet hands. Cover and rest dough between each stretch and fold for 30 minutes. Stretch and fold for 4 times total.
After 4th stretch and fold, cover and rest for 2 hours (dough should double in size).
Lightly flour your counter.
Turn the dough out of the bowl onto the counter.
Cut the dough into two equal pieces. A dough scraper works great.
Shape each piece (loaf or round) and let rest on the counter for 30 minutes.
Dust bannetons with rice flour or flour.
Work each piece into a loaf/round.
Mix the four seeds and place on the counter.
Spray the loaf/round bread dough lightly with water and carefully roll each piece in all sides in the seeded mixture to cover all of the “crust” area.
Place the dough loaf/roll in the banneton with the seam side up. Cover with tea towel and rest for 1 - 2 hours.
Preheat oven to 450 F. If using cast iron Dutch Oven or cast iron loaf pan, preheat as well. After oven is heated, take the baking pan out of the oven, and tip one banneton carefully into the heated baking pan.
Score each loaf in your chosen pattern.
Bake Dutch Oven rounds with the lid on for the first 20 minutes then remove lid for an additional 20 minutes until the crust is golden brown and crusty. If using loaf pans bake uncovered for the whole 40 minutes.
Repeat for the second loaf if not baking at the same time.
Cool completely on racks (1-2 hours) before slicing.
Mise en place is like setting the stage for a baking show—it's all about getting everything ready and organized before you start! The phrase means "everything in its place," so it’s about measuring out your ingredients, gathering your tools, and prepping everything so you can bake without any last-minute scrambles. It’s like a backstage pass to smooth, stress-free baking where everything flows just right!
Sourdough Terms to Know:
Autolyse in sourdough bread making is like giving your dough a little rest and relaxation before the big workout! It’s the process of mixing flour and water and letting them sit together for a while before adding the starter and salt. This helps the flour fully hydrate and helps the gluten develop, making the dough smoother and easier to work with, and it helps boost flavor and texture. Think of it as giving your dough a head start on becoming its best self!
Levian is like your sourdough starter's cool, older sibling! It's a bubbly, homemade mix of flour and water that's fed with a little love and patience to grow into a lively, flavorful powerhouse. When you make levain, you're giving your sourdough dough a special boost of natural yeast and bacteria, helping it rise with extra flavor and that delicious tang. Think of it as the secret ingredient that turns your bread from "meh" to "magnifique!"
The sourdough stretch and fold is like giving your dough a gentle workout to help it build strength and stretch into its beautiful shape! After your dough has had a nice rest, you grab a corner and carefully pull it up, then fold it back over itself, like a cozy little dough burrito. You repeat this a few times, and each stretch helps the dough develop structure, creating those airy pockets that make sourdough so deliciously chewy. It’s like giving your dough a nice little yoga session—stretch, breathe, and rise!
A sourdough banneton is like a cozy bed for your dough to take a little nap before it bakes! It’s a special basket, usually made of wood or cane, that helps your dough hold its shape as it rises. The lines in the banneton give the dough a beautiful, rustic pattern, and the breathable material helps keep the dough from getting too soggy. It’s like a gentle hug for your bread, helping it rise to perfection and ready for its big moment in the oven! Tip: sprinkle with rice flour before using to prevent sticking.
Baking sourdough in a cast iron pot is like giving your bread a spa day—it creates the perfect environment for your loaf to thrive! The cast iron holds heat like a cozy blanket, making sure your bread gets that lovely crispy crust while staying soft and airy on the inside. Plus, it traps steam, which is like a mini sauna for your dough, helping it rise beautifully and develop that gorgeous golden color. It’s the secret ingredient to getting that bakery-quality crust, with minimal effort—your sourdough will thank you!
Scoring sourdough is like giving your loaf a little haircut before it takes the stage! It’s that fun, artistic moment where you use a sharp blade to make a few strategic cuts on the top of your dough. Not only does it help your bread rise evenly, but it also lets you get creative with fun patterns or designs. It’s a little moment of zen where you can feel like a true bread artist—plus, those cute little scores make the crust extra crispy and beautifully golden. Score it like you mean it and watch your loaf shine!


Comments